Using Markdown in VS Code
— blogging, coding, web development, getting started — 4 min read

I use Markdown to write my blog posts, and I've found it very easy to use in VS Code.
Why Use Markdown?
Markdown is a plaintext format that can easily be converted to html for use in websites, but which is very readable, so that content creation is easy too! That's why I use Markdown to write my blog posts; content is easy to create in this format.
How to Use Markdown in VS Code
You can write Markdown in essentially any text editing application, from Notepad to Word to Google Docs. However, more development-focused applications like VS Code are useful because you can use them to preview your file's appearance in compiled html. VS Code does not, however, do this automatically; you need some extensions. I use three for Markdown: Markdown All in One by Yu Zhang, Markdown Preview Enhanced by Yiyi Wang, and markdownlint by David Anson. Combined, these extensions give my VS Code environment more of the feel of an IDE (Integrated Development Environment), instead of a standard text editor.
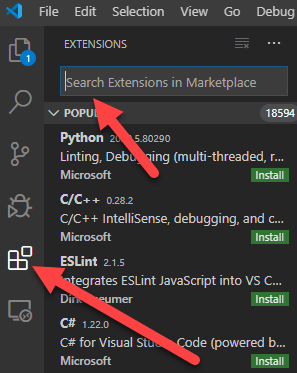
To install these extensions in VS Code, you'll want to search for them in the marketplace by clicking the extensions icon at the left of your screen in VS Code.

Once you find the extensions you'd like to use, hit the Install button to install them.

Challenges and Solutions
From here, you're all set to use VS Code to write Markdown. However, here are a few challenges I faced and how I solved them:
- VS Code is not recognizing my txt file as Markdown, and so it will not lint (search for errors in) it. Solution: At the bottom right of your VS Code Window, you'll probably see the word "Plaintext" if you're having this issue. Click that word, and a Select Language Mode bar pops up at the top of your screen. Type in "Markdown" and select it from the dropdown menu, and you should be all set. "Plaintext" at the bottom of your screen should now have changed to "Markdown."


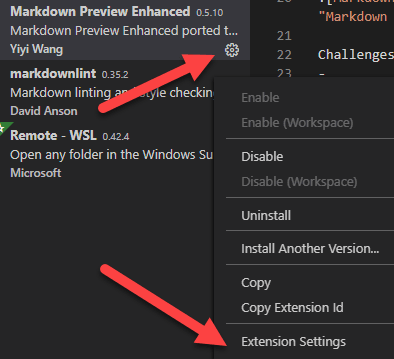
- Preview is not showing up. Solution: You'll need to make two changes to be sure of fixing this problem. First, go to the Extensions menu again and search for "Markdown Preview Enhanced" (if that's the extension you decided to install for Markdown previews). Then, click the gear icon for that extension and click Extension Settings. From here, just ensure that "Automatically Show Preview of Code Being Edited" is selected.


- Preview is not showing up (cont.). Now, you'll want to go to VS Code's Command Palette either by right-clicking or pressing Ctrl + Shift + P. In the Command Palette, select Markdown: Markdown Preview Enhanced: Open Preview to the Side. Now your preview should appear as intended.

Useful Resources
- The "Writing Content With Markdown" PluralSight course by Justin Schwartzenberger gives a great overview of the basics of Markdown.
- When you're starting off with Markdown, this page is a great resource to help you with syntax.
- Here's another page with syntax stuff. It's less extensive than the first but explains things pretty well and is good for taking a look at simpler stuff than that first page.
Summary
- Markdown is a readable format for creating content that will be converted to html.
- You can write Markdown in any text editor, or in a more sophisticated application like VS Code.
- If you use VS Code, you should install the following extensions for Markdown: Markdown All in One by Yu Zhang, Markdown Preview Enhanced by Yiyi Wang, and markdownlint by David Anson.
- Be sure to check out my solved problems explanations and the resources above to increase your comfort with using Markdown.
Thanks for reading! I hope you find this and other articles here at ilyanaDev helpful! Be sure to follow me on Twitter @ilyanaDev.