Using BlazeMeter to Record JMeter Tests
— software development, coding, jmeter, blazemeter, testing, getting started — 6 min read
JMeter is a powerful performance testing tool, but BlazeMeter can help you make the most of the time you spend with JMeter.
If you've used JMeter or read my blog post about it, you know that it's a powerful tool. You also know that it can be a pain to input every little request, especially if you're trying to test something more interactive or requiring tokens, like a login, for example. This is where recording your tests can be extremely helpful. JMeter has its own built-in recording capability, but from what I've read it only works with Firefox. As I don't have Firefox installed, I use BlazeMeter, a Chrome plug-in, instead.
Before we get started, I'd like to just assert that BlazeMeter and test recording in general is not a silver bullet, especially if you don't really know what you're doing (and trust me, I did not (do not?) know what I was doing when I first started trying to figure out BlazeMeter). If you're not doing anything requiring tokens, BlazeMeter is great, especially as a beginner, because it'll pretty much do everything else for you. But it can take awhile to get a feel for how to extract tokens if you've never done it before.
Setting up BlazeMeter
If you want to use BlazeMeter, you'll need to do two things: install the Chrome plug-in and set up a free account.
The Chrome plug-in can be found here. Once you have that installed, open up BlazeMeter from the top-right plug-ins icon and sign in or create an account.
Recording your Test
Once you've gotten BlazeMeter set up, it's time to record your test.
- Name your test (red arrow)
- Start recording (green arrow)
- Record all the actions you'd like the test to take
- Stop recording (purple arrow)
- Download .jmx file (yellow arrow)
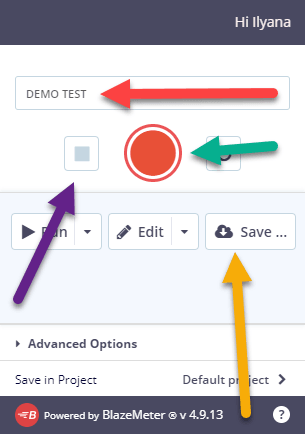
When you press Save, you'll be prompted to select JMeter, Selenium, or both. For our purposes, you just need to download the JMeter.
Once you've downloaded the file, be sure to move it to an appropriate folder and make a copy of it before you start working on it. For me, I have a "JMeter original records" folder and a "JMeter work" folder in my scratch folder. This way, if I mess up when I'm working with a file in JMeter, I can always revert back to the original recording. It's also generally a good idea to use some sort of source control and/or git.
Note: BlazeMeter also offers functionality that allows you to run your test in the browser. This is convenient, but I think JMeter probably your best bet if you need to make any changes to your recorded test (as is the case with login testing and anything else requiring a token). I suspect BlazeMeter has some editing functionality, but I haven't worked with it enough to figure that out.
Making the Test Work
At this point, you can start to work with your test in JMeter. Open up JMeter, and then open your .jmx file from the Open File dialog box (File -> Open). If you're fuzzy on how to install/open JMeter (which is not entirely intuitive), take a look at my previous blog post on JMeter.
When you first open your recorded test, you'll probably notice a whole bunch of Config Elements have been automatically added to your test. This is one of the best parts about using BlazeMeter; I never would have had any clue which of these elements to add, what settings I should select, etc. BlazeMeter takes care of that for me.
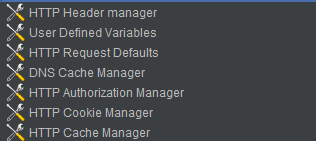
At this point, your test might "just work." But if it involves a token (you're probably getting tired of me saying this, but it's true), it won't work just yet. If you're curious, add a listener (like "View Results Tree"), and then press that green arrow at the top to find out.
Every test is different, so the changes you'll have to make will vary, depending on what you're trying to do. The test I was working on involved a login, so I needed to extract a token to use in the login form.
When BlazeMeter first recorded the test, this token was included in the login POST request. However, it was hardcoded, which doesn't really work, as the token changes with each session. So, I ran the test, found where the response data provided the token in a previous request, and used a regular expression extractor to extract that token.
So, to break that down:
I knew my token was called "_RequestVerificationToken". I searched for that in the response data from requests prior to the login POST request.
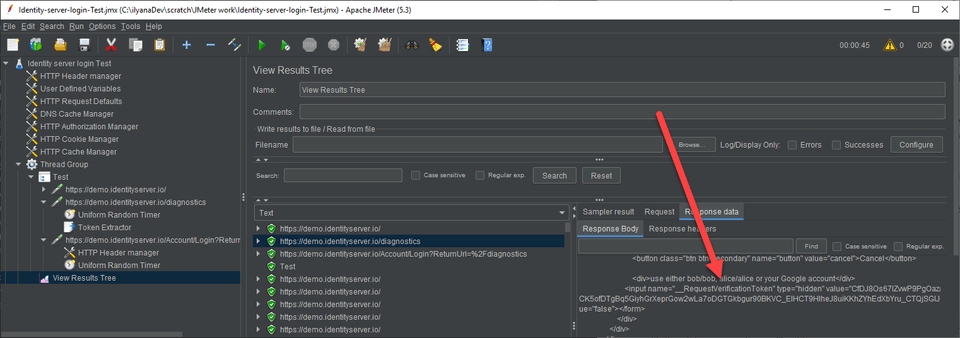
From there, I added a Regular Expression Extractor (found under Post-Processors) to that request. I copy-pasted the relevant segment of the response into the Regular Expression field, but I replaced the value of the token with (.*?) to indicate that that area was what I wanted to extract. I also chose a default value of NOCOOKIE to make it super obvious when I looked at the requests if my extractor wasn't working.
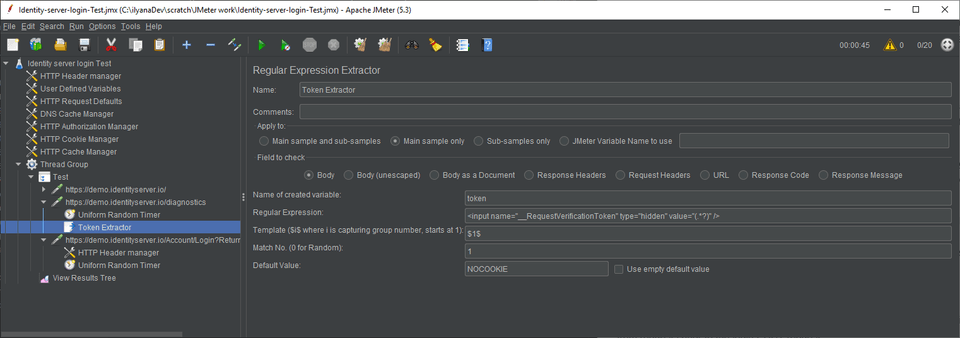
Note: Why did I select "NOCOOKIE" as my default value, as oppposed to something like "NOTOKEN," which would've made more sense? Great question! Basically, I had myself confused and spent some time trying to extract the cookie instead of the token, which is part of why it took me so long to figure out how to make this work. BlazeMeter automatically adds a Cookie Manager, so do not worry about making sure you're sending the right cookie; that should be taken care of for you.
Finally, I put the token value into the field of the POST request, replacing the hardcoded value. The syntax JMeter uses for this is:
${variableNameHere}

At this point, I finally had my test running without errors.
Troubleshooting
When in doubt, F12 is your friend. Press F12 to open up your devtools in your browser. If you've never played with the devtools, just open them up and have some fun. I could write a whole blog post about this, but one of the coolest features is the Elements tab, which you can use to mess with the styles on a webpage like this:
However, the useful feature for troubleshooting JMeter tests is the Network tab. When you have devtools open, this tab will keep a record of all the requests made, the response data, etc. If you're having trouble getting your recorded test to work, do your test manually with the devtools open and then compare the requests/responses your JMeter test sends/receives with the ones your devtools show you.
Resources
- This tutorial video has a pretty good explanation of how to use BlazeMeter to record and run performance tests (explanation starts around 1:20)
- If you're interested in learning more, take a look at my related blog posts: Creating a JMeter Test and Web App Performance and Scalability Testing
- You can find the test I used as the basis for this blog post in this GitHub repository. The final test is "Identity-server-login-Test.jmx" and the original recording is "Identity-server-login-Test-originalrecording.jmx"
Thanks for reading! I hope you find this and other articles here at ilyanaDev helpful! Be sure to follow me on Twitter @ilyanaDev.